Saturday, November 24, 2012

Snowflakes and Glitter

 When you start doing some serious scrapbooking or cardmaking, you see quickly that the possibilities are endless.  I had the pleasure of purchasing a new machine this week that cuts and embosses shapes.  It is called the Spellbinders Grand Calibur.  In the card above, you see the shapes that the snowflake is on?  That is three separate cuts of three papers that nest together; each one a little larger than the last.  This is my first project that I completed with the new machine.  Another new to me product is the super fine sparkle glitter that I added to the snowflake after I stamped it.  I used Close To My Heart's Liquid Glass (Z679, $6.95) to add the glitter.  It dries completely clear and is easy to use in the space and thickness you desire.  I cut my 5 x 7 card from CTMH White Daisy cardstock, then embossed another white rectangle panel with my CuttleBug machine using the snowflake embossing folder.  I added white satin ribbon taped to the back of the rectangle and then adhered it to the card.  Then I cut the three shapes at one time on the Grand Calibur using the "Labels One" dies.  I used foam tape to "pop-up" the three labels from each other.  I used two stamp sets for the front of the card.  The large snowflake is from New Fallen Snow (D1171) and the "Merry Christmas" and circle is from Tag The Occasion (B1362).
Inside, I used two other stamp sets, Snow Flurries (D1384) for the snowflake and Peace On Earth (D1243) for the sentiment.  This is a simple to make, but absolutely beautiful card.  Take advantage of the tools that are on the market, especially at Holiday Season prices.  They can really make your work SPARKLE!!

Tuesday, November 20, 2012

Getting in the Christmas Card Swing of Things

Hello!  Hope you are having a good Thanksgiving Week!  We have been very busy at our house decorating for Christmas.  What?!  Yes, that is correct.  My husband is a Christmas Decor FREAK!!  Having a December birthday has decidedly shaped his seasonal urge to go loony for lights, bulbs, santa, and anything red, green, or sparkly!  He took the Christmas boxes out of the attic before I could get the Halloween decorations put away!  By last weekend, our front yard was a spectacle to be seen in the neighborhood and soon to become a blip on Google Maps!  We now have 3 trees up and decorated inside our home.  After this weekend, there will be at least one more....a Hello Kitty tree for my ScrapLoft.  (That one is ALL ME!)

I have had the good fortune to spend several days making Christmas cards.  Christmas has always been about family in my household.  It's always also been about Love and Peace and Kindness.  My family does not celebrate Christmas as Jesus' Birthday.  We know that many other Christians do.  We know that the bible does say, "For unto us a child is born, unto us a son is given; and the government shall be upon his shoulder: and his name shall be called Wonderful, Counsellor, The mighty God, The everlasting Father, The Prince of Peace."  -Isaiah 9:6.  In the spirit of "Peace on Earth", I give you this card that I made to send tidings of Love and Peace and Good Will.  Happy Thanksgiving to you and yours.  xoxoxo  Sherry


Sunday, September 30, 2012

Elegant Wedding or Engagement Card

Who doesn't love a wedding?  Romance, emotion, Love, giggles, happiness.  My beautiful niece, Danielle will be married this week in Georgia.  I sadly cannot attend the wedding.  I wanted to send her a beautiful card to convey how very much I wish her and Charles a wonderful life full of all the good things.  I came up with this card.  (Hers is a little different...)  What is more elegant than black, white, cream and silver?  When making cards by hand, it always adds elegance and polish to "mat" your papers.  The front of this card has 7 paper layers and two ribbon layers.  Wow!  You don't really feel them when holding the card.  I started with a black card base, added a floral paper with a black mat and a white mat.  I adhered the wide black satin ribbon and the slim white satin ribbon to the floral cardstock (wrapped around and taped in the back) before adhering the floral to the black and white mat.  This "hides" your assembly and makes the card appear like it was "made" that way or "seamless".  Then I cut the shape under the heart out of a black on black baroque printed paper from my Cricut Cartridge and matted it with white again.  Finally I embossed a heart shaped stamp in silver on Colonial white cardstock with foam tape to make it stand out.  Then I used glitter glue to fill in the silver embossed "vines" on the heart.  The cream floral paper already had silver glitter in the center of the flowers, so again, adding it to the heart gave it a more polished look.
Inside I added a CTMH stamped sentiment, "Wishing you Peace, Love and Happiness" from the "Lovely Lily" stamp set (B1401) and then a French Bow from a NEW CTMH stamp set called "Jardin Flair" (D1528).  In the center of the ribbon I added an "Opaques light tan Adhesive Gem" (Z1333, $2.95).  What a beautiful and elegant sentiment for a gorgeous card!

Friday, September 28, 2012

Boo From The Crew!

It's that time of year when we start pulling out sweaters, showing off our fashionable scarves and getting ready for Halloween!  Halloween is actually my least favorite holiday.  I don't know if it is because my kids are grown, or if my optimistic attitude doesn't like the "dark" side of the ghoulish day, or if Orange and Green are just not my pick of colors.  However, one look at this cute stamp set from Close To My Heart put me in the mood for some Halloween card making!  I saw this little ghost and thought he could be made into something sweet and have the ability to put a smile on some one's face....And a SMILE?....yep, I'm all for that!  I went to my trusty box of premade cards and envelopes (they are a card maker's dream...especially if you find them half off or on clearance!) and picked out the bright yellow cards. Link to Example Box of Cards 
Then I searched for some coordinating paper and found the orange wiggly stripe that you see in the picture.  I always cut my background piece 1/4 " shorter than my base card.  Then I rounded the corners to give it a softer look....which works well because the ghost doesn't have hard edges!  Then I used CTMH Colonial White cardstock to cut a smaller piece to stamp my ghost onto.  Almost always, I ink all my edges...it puts polish on your project and really makes everything work well together!  I put "sunset" ink on the pumpkin and black on the rest of the stamp.  Then I added the sentiment in "sunset".  I saw it still needed something....so I added a black rat and a black bat.  I LOVE glitter, so I added some glitter glue to the bottom of the ghost.  
On the inside of the card, I used a piece of Olive cardstock, again cut down 1/4" from the size of the card and rounded the corners and inked the edges.  Then I used a colonial white piece cut from the "Art Philosophy" cricut cartridge (Z1686) and adhered a coordinating Dimensional Element (Z1685) that I had stamped in "Sunset" with one of the stamps that comes with the Cricut Cartridge kit.  This left room for writing a note and a signature.  You can purchase the solid cardstock, ink, stamps, and cricut cartridge and more in my CTMH shop to make your own "Boo from the Crew" card.  The "shop with me" link is on the right side of my blog!  Boo! from my crew!  Have a safe and Happy Halloween and fall season!  

Monday, September 24, 2012

Avonlea Photo Box

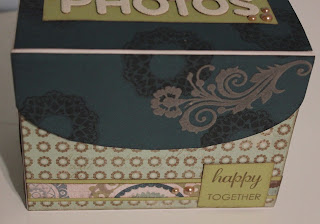
I realized today that I haven't shown you the Photo Box I made from the leftover paper in the Avonlea Workshop Kit!!!  It came out soooo cute!  I don't know about you, but I have seen this type of "altered" project before and thought, there's no way I can make it look that good!  Well this altered project was an exception!  I followed the instructions that were given to me and with a few minor adjustments finished up with this gorgeous box!  
It is covered with Avonlea paper on all four sides.  The only thing that I found I had to adjust was the template they gave for the front and top of the box.  It's a much better idea to just trace your empty box.  If you would like to make this box, go to my "shop with me" icon on the right of this blog and purchase the Avonlea Scrapbooking Workshop kit (pg 21 of catalog, #G1045, $29.95), a My Creations Photo Box (#Z1322, 6.95) and if you wish, a Color-Ready Canvas Alphabet (#Z1777, $6.95).  The canvas alpha was used to spell out "PHOTOS".  You could substitute with an alpha stamp set of your choice or the letters cut from cardstock with your Cricut.  Although, the texture and look of the canvas is a really nice addition to the project.
The box is plain white inside and comes with a magnetic closure.  This would be a lovely Christmas gift!  


Friday, September 21, 2012

One Fine Day

Close To My Heart has the BEST scrapbook kits!!  They put together the greatest paper packets with embellishments, stamps and great design.  I had the pleasure of working with the Typeset Workshop Kit this past week.  Typeset is no longer available, but I will show it to you so that you can see the amazing things you can do with a CTMH kit!  
My son Michael was lucky enough to visit with my Mom in Virginia every summer.  We lived in Georgia for many years, so he would come up and visit for several weeks.  In June of 2000, Hampton Roads had its first Opsail celebration.  Tall Ships from all over the world come to our area to visit.  Mom took him to Opsail that year and they had an incredible day.  That is the pictures I used for this layout and they came out amazing!  The kit came with specific instructions for cutting, preparing and laying out the pages.  I used the first CTMH cricut cartridge, Art Philosophy to cut out the large shape behind the pictures.  
The kit included an exclusive stamp set that had the "star" and "button" stamps and the "UR special" stamp.  The "FINE" I stamped was from one of my other CTMH stamp sets called "Token Alphabet".  It is still available for purchase (E1020, $29.95) in my CTMH shop.  The "cardboard" shapes I used are also still available (Milepost shapes, Z1464, $3.95) and come in a pkg of 48 pieces of arrows, circles, shapes, circles, ovals, etc.  
I'm not sure if you can tell in the picture, but the kit called for me to use my pearl paint to highlight the cardboard shapes.  That was fun!  There is also a little paint brushed directly on the page.  I love the texture in this layout!  The yellow (creme brulee) stars were cut out using the cricut cartridge and then I used my bone folder to score them on the back to make them pop up!  To bring this page altogether, I inked all of my edges with cocoa ink.  It was One Fine Day in my Scrap Loft!    
Then, I was able to make a SECOND layout on my own.  Bryan is my shining star.  I made this for him, but I do have ONE for sale on my Etsy shop, Kindness Paper.  You can find it at http://www.etsy.com/shop/KindnessPaper.  I used the paper left over when I cut out the background shape from the first layout for the top of this layout!  
The shape is echoed in the bracket on the right side of my son's photo and in the shape on the left side of the photo.  See how it makes the page visually appealing?  
I used the same alpha stamp again to stamp the "YOU" on the banner.  Then, I used my new CTMH crictut cartridge, Artiste, for the "shining STAR".  I used the same pearl paint to make the letters "shine".  The only thing that isn't CTMH on this page is the star punch I used above the "shining".   Keep in mind that you can use ANY Paper kit from CTMH to make this SAME layout!!!  Once you have the design, that's all you need!  Let me know if you try it on your own, I can send you some of the measurements I used.  What a great kit!!!

Monday, September 17, 2012

My Flirty Layout

Happy Monday everyone!  I finally finished MY Flirty Workshop (see yesterday's post!) layout this morning and can share it with you.  I added my own touch to the layout by taking out the Fall Elements that was instructed to use and switched them with the pretty roses.  In the left lower hand corner...you can see that these pictures were taken in May of 2006.  Bryan and Hunter were 10 years old and at such a FUN age!!

I love to play with embellishing my Titles by hand inking.  This time I decided to add chocolate ink to the right hand sides of all the letters...it really makes them "POP".  Then I decided to search for my old Close To My Heart rub-on's and added the "Memories" on the side of the "Family" title's "F" and "friends forever" between the two kids.  I also used the rub-on's to add "Bryan & Hunter" on my Journal spot.
Hand-writing your journaling even on the most put-together page can really make your page.  It brings that "homemade" warm feel to your most precious memories.  It will draw the person looking at your album into the story.  We are so blessed that Bryan & Hunter have become the greatest friends.  I hope their closeness will last their lifetimes!  I welcome your comments and suggestions on my artwork!  Just go to the bottom and click on "comment".  You can also subscribe to my blog at the bottom of the page.  Thank you for reading!

Sunday, September 16, 2012

Today I had the great pleasure of scrapbooking the Flirty Workshop (G1050, $29.95) with two of my good friends!!  "Flirty" has a GREAT color scheme!!  It came out in the catalog as a "FALL" kit, but the colors are so great and flexible, they can be used all year long!!!  The Workshop is a kit that gives you instructions and supplies to create FOUR two-page layouts.  With the purchase of two additional items, you have enough supplies left over to create 5 greeting cards as well (Z1738, Colonial White Die-Cut Cards & Z1749 Autumn Lane Assortment).  
The Workshop Kit comes with an exclusive stamp set that you can only get through buying the kit!!  It also comes with all of the paper you need, Dimensional Elements chipboard shapes (see the tree and the leaves in the picture), and a sparkles clear assortment (rhinestones).  All you need to purchase is the kit, an alphabet stamp set (or use one you already have or one of the "Cricut" cartridges if you own it), Cocoa and Goldrush ink pads, and a corner rounder.  If you are lucky enough to be in the Hampton Roads area, you don't need all the extras, you can just come scrap with ME!!  On the upper right hand side of my blog, you will see a link to "Kempsville Scraps Classes/Crops Calendar".  Click on "Meetup" and it will take you to the Meetup website.  Meetup is a place where an organizer (like me) can go to upload a calendar of  classes/dates or "Meetups" so that folks like you can find other like minded individuals who have the same hobbies as you do!  They have great tools for me to use to share my calendar with members of my local paper crafting/scrapbooking group.  Please join us if you can!

Thursday, August 30, 2012

Amazing deal on Cricut.com!

If you have been on the fence or curious about the Cricut die-cutting system, the Cuttlebug or the Your story machine...the time to stop procrastinating is now!  Cricut.com has an amazing deal while supplies last.  Click on this link to learn more:  Cricut Ultimate Starter Bundle.  If you are in the Hampton Roads area, I will be holding technique classes for the cricut and the Cuttlebug embossing system.  Over time, I purchased all of the items in the bundle separately and can't even imagine how much I paid...it wasn't near $199.00!  Leave me a comment if you take advantage of the offer, because I'm still in disbelief!  Xoxoxo

Friday, August 24, 2012

Etsy Craft Party

I have truly enjoyed having an Etsy shop.  What is Etsy??  Etsy is www.etsy.com.  An internet site where YOU can "Buy unique handmade and vintage items directly from independent sellers around the world."  I sell my handcrafted paper items in my Etsy shop.  I also sell a few vintage items from time to time.  It is a super easy way for me to buy items that I LOVE and to sell the items that I make.  You can pay through PayPal or use your credit card directly on the Etsy site.  My shop is at http://www.kindnesspaper.etsy.com.  There is a link you can click on to the left of this post!  
Etsy has a "Craft Party" once a year for the sellers on Etsy.  A local shop chooses to organize the party for the area.  This year it was held at "Kitsch" in Norfolk.  They had a station where you could make and take an owl...see my cute little guy??  Yes, you guessed it!!  It's made out of a toilet paper roll!!  What an awesome craft to share with the kids in your life!!!  All you do is wrap the paper and tape it around the roll, punch or cut two circles for the eyes and a triangle for the nose and voila!  I might have to make a whole family of owls!!  HA!  You can check out Kitsch online at "Kitschva.com" or in person at 807 Shirley Avenue, Norfolk, VA  23517.  Thank you to Kitsch for your sponsorship of the Etsy Craft Party this year!  I enjoyed it!!!  

Thursday, August 23, 2012

Thank You!!!

Thank you to all my new customers and blog readers!!! If I could reach out and give you a hug, I would!  Here's a little Kitty carnation for you instead!  xoxoxo  Sherry

Tuesday, August 21, 2012

Superhero Bonus!

In my last post I showed you a layout you could make from the Superhero paper packet.  I made 3 layouts so far out of that packet.  I still have some left over to make a one page layout, but I decided to get crafty (now there's a surprise!) and make a little note card for my honey.  On the new Artiste Cricut Cartridge only available through Close To My Heart (CTMH) there is a page dedicated to Father's Day.  There's the cutest little things on that page like argyle diamonds, an argyle border, a cupcake cup, a bow tie/shirt goody box, a Happy Father's Day title, and a #1 Dad sentiment.  There's also this cute little dress shirt/tie card that you can make.
It cuts out flat on the cricut and you fold it over to make a card.  I cut mine at 4 1/2 inches and it made a small card, a little bigger than gift size.  On the other side of the red Superhero paper is the side that has the "Superhero words" on it.  It has a moonstruck blue background, so if you were making a card, you would have to cut some lighter paper to go inside to write or stamp a sentiment.  I thought, hmmm....I'm going to make my honey a cute note for him to take to work and put in his desk.  

I cut a small strip of the chemistry table paper and wrote him a sweet note.  It tucked right up into the shirt!  Cute!!  You know, men really like to be reminded that they are your hero.  It feeds into their macho, caretaker/provider need.  He really liked it!  What a cute way to use some leftover paper!!!
Just a reminder that the Superhero paper packet is not in the new catalog.  It can still be ordered as long as supplies last.  The item number is X712B.  At $9.95 it is an incredible deal.  If you have a Cricut or have been thinking about buying one, you have to check out the cartridges that CTMH offers.  They are incredible deals that you won't find anywhere else!  

The Cricut® Artiste collection helps you turn everyday events into magical celebrations! The unique cartridge takes creativity to a new level allowing you to cut themed projects and shapes using a single key. Color-coded images in the accompanying booklet indicate shapes that are linked and can be cut using the same size setting for hassle-free layering and assembly. Choosing a themed project is easy with the project reference pictures, and assembling 3-D items is a snap with the separate assembly and folding guide.
With 700 images, you’ll find a themed project for any event, large or small, from Valentine’s Day, Christmas, and Halloween, to occasions like birthdays and baby showers, plus clever motifs like signage, game night, gears, timepieces, awards, and more. Use the three coordinating My Acrylix® D-size stamp sets to jazz up your Cricut accents, then splash in some Dimensional Elements shapes from the three included sets for added flair! The Cricut® Artiste cartridge makes it easy to create a charming, cohesive project, taking you from crafter to awesome artiste in a flash.
Cricut® Artiste Collection (Z1790)
$99 (retail value of nearly $125)
1 – Cartridge (700 images: themed projects, cards, font, shapes, 3-D items)
3 – My Acrylix® D-size Stamp Sets*
3 – 12" × 9" Dimensional Elements in coordinating shapes

SUPERHERO and Best Friends

Have a son or grandson?  (Of course, Superhero could apply to a Dad or Grandpa too!) Have you seen the Superhero paper from Close To My Heart?  I have made 3 different fun layouts with the paper packet.  The packet comes with 6 sheets of patterned paper (CTMH calls them B&T duos), and 6 sheets of coordinating cardstock. All for $9.95!  The item number is 'X7152B'.  If you like my layout, you can either buy the layout in my Etsy store or purchase the paper packet on my ctmh store.  Click the box to the right that says, "Shop with me".
I chose this two page Best Friends layout to share with you:

All of the items I used came in the paper packet except black hemp to tie on the "chemistry paper" tags.  That is item #Z282.  I also used the Art Philosophy Cricut cartridge to cut the tags and the NEW Artiste Cricut Cartridge for the title "Best Friends".  The photo spot on the first page is cut at 4 1/4" x 6 1/4" so that you can add a 4 x 6 photo of the friends!  The sentiment on the side is "Dynamic Duo".  What do you think of the "torn" paper look?  It adds texture to your page.  I also took my black pen and added dots at the top of the letters to make them stand out more.  It's the little things that really make your page look polished!


On the second page, the white space at the top is for journaling about the best friends.  The two smaller photo spots to the right are for individual pics of the two friends.  Add a white sticker alphabet (CTMH used to carry one..can't find it at the moment...) at the bottom right corner of each pic that spells out the boys' names and you will LOVE IT!  The two larger photo spots are 3 1/2 x 5 to add some comical pics of the boys.  Think superhero stuff if you want to do a photo shoot with the two friends.  :)
Leave me a comment to let me know what you think of this layout!  Now, let me see if I can go feed some hungry superhero's in my household!  xoxoxo  Sherry

Monday, August 20, 2012

August Specials

Hey Ya'all I have $5.00 specials for my FIRST MONTH as a CTMH Consultant!!! To celebrate National Stamping Month in September, CTMH is offering a double stamp set! You can get the exclusive My Acrylix® It’s Your Day double stamp set for just $5 when you place a minimum order of $35 in full retail products from August 15 through September 30, 2012. Visit my business page at: http://kindnesspaper.myctmh.com/
You’ll love this double set — two D-size sets in one envelope — which includes nearly 50 trendy images that makes it easy to capture the everyday moments in your life. With a retail value of $35.90, this set drastically increases the value of your qualifying purchase. Have twice the fun stamping during National Stamping Month with your new It’s Your Day double stamp set!

This is my SECOND Exclusive special to customers who book a gathering or on-line party with ME!! Anyone booking an in-home gathering from me can order the FLIRTY workshop ($29.95) for $15.00!! You can make 4-5 layouts from that workshop, but you must place your order through me. Just let me know and I'll order it for you! I will be hosting TWO different workshops at NO CHARGE to anyone purchasing FLIRTY here in the Va Beach area. LET ME SHOW YOU HOW.... is my MOTTO!! xoxoxo Workshops on the Go® Flirty Kit Contents
Flirty Paper Packet
My Acrylix® Flirty Workshop Stamp Set (C-size)
Colonial White Cardstock Sheets (2)
Sparkles Clear Assortment
Flirty Complements Dimensional Elements
Instructional Guide
Featured Colors: Flirty Raspberry, Flirty Yellow, Goldrush, New England Ivy

Follow the included step-by-step instructions to create the two-page layout featured in the workshop guide. The layout pattern is a Jeanette Lynton original created exclusively for this workshop. Then use your remaining materials and online tips to create an additional layout and a bonus project, shown in the guide.

Monday, August 13, 2012

Time Flies

This week I have been working on Close To My Heart's "Avonlea" workshop. The workshop features a two page layout entitled "Time Flies". YES IT DOES. Last night I had a date with my husband. We went to the Poison/Def Leppard concert here in Virginia Beach. The songs took me right back to my high school years. Poison has been performing for 25 years; Def Leppard for 34 years. I remember watching their videos premier on MTV! It was a great break to go and get my wiggle on at the concert; I didn't sit down the whole time the bands were on!
As I was working on the "Time Flies" layout, I was able to see how quickly my son, Bryan has grown!
I love the color combination in Avonlea. When you have boys, you don't always want to go with typical BOY papers. The colors in the kit (teal, olive, chocolate, slate) are masculine in my opinion. It was nice to mix-up the image colors with this kit.
LOVED the velour rub-ons! Not only did they add great texture to the layout, they were super easy to apply!!
This is the first time I have used my acrylic stamps reverse side! You use the back of the stamp in "second-generation" stamping, and then stamp the correct side with "first-generation" stamping! I know you are saying, ?WHAT? Second-generation means that you ink your stamp, stamp it on a scrap paper, and then stamp it a "second" time on your layout. It comes out lighter and gives an "aged" look. Then you can put your "first" and regular stamp on top of it and have a light outline to it. See the picture to clarify my words.
I will be sharing the additional layout from the Avonlea workshop and the additional project later this week! Let me know what you think of Avonlea! I am getting really excited for my FIRST gathering that I am hosting at my home this Saturday!! Can't wait to share my excitement, passion and knowledge of CTMH with my friends!! Wish me luck!!!

Tuesday, August 7, 2012

Brothers Layout using "Dotty For You" Paper Packet

Close To My Heart has a lot of cool specials every month.  Recently I was able to take advantage of one of them and purchased 3 packages of paper called "Dotty For You".  The colors are really great, so I thought I would use some black and white photos from when the boys were young.  What do you think??
When you are building a page, having a strategy for contrasting papers works well. In this instance, I used coordinating papers (thanks CTMH!) in a small dot, stripe, and a large pattern. This would also work with a small check (or small pattern), a stripe, and a large floral. The contrast of the different papers is very appealing to the eye.

The colors in this project were so bright, that adding Black and White images really works well to bring the attention to your photos. All items used in this project are CTMH except for the "Brothers" alphabet is from ColorBok and I'm not sure about the round wooden circle.

Monday, August 6, 2012

I AM NOW AN OFFICIAL CLOSE TO MY HEART CONSULTANT!!!!

I have been waiting for MONTHS to become a CTMH consultant! I have been a CTMH customer for YEARS! I LOVE their products. They are high quality, very affordable and they carry a great selection of items! I returned from our 3 1/2 years in Japan (My hubby recently retired from the NAVY!); and started planning for my business. I finally took the plunge on August 1st so that I could take advantage of the Bonus Free Exclusive Tote Bag!

When a new Consultant joins Close To My Heart in August they will receive an exclusive Damask Tote Bag for FREE (retail value $50)! This offer has limited availability, so if you have been thinking about becoming a scrapbook consultant act quickly to ensure you score this darling tote bag. This offer is good for both the $49 and $99 New Consultant Kits (while supplies last). This is the same cute bag we gave to Consultants who attended Convention 2012 in Dallas. Bag offer is valid August 1, 2012 (9:00 am MDT) – August 31, 2012 (11:59 pm MDT)

I love paper crafting from card-making to scrapbooking and many other things in between. I have a shop on Etsy.com to sell some of my creations. You can find it at

I will be using this blog to share techniques, tips, and how-to's about my creations. I will also share current CTMH information. Please contact me if you have any questions regarding CTMH products.

Over the next week I will finalize planning my first home-gathering in my home. I will also be taking on-line courses learning about Close To My Heart!